Okay, I don't have a smart phone or data coverage for my iPad and it drives me crazy to see others getting coupons that are only for smartphones!
Not to be daunted, I've discovered some workarounds. If you do have a smartphone, you might still find a couple of tips here that are valuable.
Joanne's Smartphone Coupons
On my desktop, I was able to pull up the Joanne's coupon for mobile. Did a google search for Joanne's coupons and went to a blogsite http://printable-coupons.blogspot.com/2005/12/jo-ann-coupons.html and clicked on Mobile Coupons. I had to enter my cell phone number, but it gave me a 50% off coupon. There is no discount coupon available in other Joanne ads this week, so this is a valuable coupon! I was able to print the coupon at home. There isn't anything on the coupon saying mobile only, so I'm assuming it will be accepted in the store. I have also found that Hancock Fabrics will take competitor coupons, but ONLY in print, not on a smart device so I can use it at Hancock or Michaels for that matter.
Can I get the coupon on my iPad? Yes, and here's how! I opened the coupon on my browser (in my case Explorer), then by clicking on the down arrow by 'Page' I can email the coupon to myself. I then opened the email on the iPad and took a screenshot of the coupon, saving it to the camera roll on the iPad, so now I can show the coupon on my iPad in the store. How green can you be!
How to Take a Screenshot on iPad
If you haven't learned this valuable trick on your iPad, read on! Anything you are viewing on your iPad can be stored as a .jpg in your camera roll. It will take a 'picture' of exactly what is displayed on the screen, coupon from a webpage, info in an email, etc. You can zoom in, move the image around, get it arranged however you want and then, at the same time, push the round button on the face of the iPad (bottom center) and the power button (top right) for just a sec and you'll hear a camera shutter sound and voila, you have captured the image on your screen. Open your camera roll and at the end of the photo collection you will see your screenshot.
I'm off to save some money at the Fabric store, hope I can help you save too!
Happy Stitching!

Thursday, December 29, 2011
Monday, October 24, 2011
New fabric bonding agent
Reading my Facebook page today and saw a post for this new product:


I use many permanent bonding agents in design and am always pleased to see a new one! Haven't personally tried this one, but have had good results from other Aleene's products. It says it is washable. Drycleanable too???? Don't know.
Not for use on stretchy synthetic fabrics it says, wondering if that is stretchy and synthetic or if they mean also synthetic fabrics that are non-stretchy. Will have to give it a try and see how it works! Have used 3M permanent bonding tape, will need to compare this with their product. One great advantage, this product comes in small sheets as well.
Have you tried this product? What did you think?
Happy Stitching (though not with this one!).
Monday, October 17, 2011
Coupons, Discounts and Sale! Fleece fitted sheet~link to tutorial
Joanne Fabrics has all thread on sale this week 50% off. No coupon needed, no limit, all brands. Go stock up now!!!
Of note: If you were not aware, Joanne Fabrics and Michaels Crafts take each other's coupons! Both have coupons in the Sunday paper and the same (and sometimes more) offers online. 'Like' their FB page and/or sign up for email alerts for reminders!
Fleece Fitted Sheet
I wanted to share a link I found with instructions on how to make a fitted sheet from Fleece. Perfect timing with Fall weather upon us (or close) depending on where you live!
 haddygracedesigns.blogspot.com
Simple, easy to follow instructions on this blog for twin, full or queen sized fitted sheet.
Happy Stitching!
Of note: If you were not aware, Joanne Fabrics and Michaels Crafts take each other's coupons! Both have coupons in the Sunday paper and the same (and sometimes more) offers online. 'Like' their FB page and/or sign up for email alerts for reminders!
Fleece Fitted Sheet
I wanted to share a link I found with instructions on how to make a fitted sheet from Fleece. Perfect timing with Fall weather upon us (or close) depending on where you live!
Simple, easy to follow instructions on this blog for twin, full or queen sized fitted sheet.
Happy Stitching!
Monday, October 3, 2011
Wednesday, September 14, 2011
Color Game

Just got back from a fun presentation from Pittsburgh Paints on color trends for 2011. When I think paint colors, I'm never sure where to begin. Pittsburgh Paints has a cool app on its website called the Color Game. Answer a series of questions and it will suggest paint color palettes that will match your personality! I tried it and did like the colors it presented me.
Find out what your personality says about color choices here:
Tuesday, August 16, 2011
Clever Cards!


Many photo developers will print a deck of cards with any image you want. A colorful photo, a graphic image, oooh, this could get good!
Instructions for many variations of the construction are here:
http://blog.makezine.com/archive/2009/12/math-monday-playing-card-constructi.html
Happy Crafting!
Saturday, August 13, 2011
Fiber Art Necklace/Scarf
Some years ago, my Mom bought me 2 necklaces at a craft fair that were made of beautiful fiber yarn. Every time I wore them, people commented on how unique they were. I hadn't worn them for a while and ran across them in a drawer the other day. One was just the right color for an outfit I was wearing, so I wore it once again after several years. Once again, I got many comments and decided that this might be a unique item to add to my Etsy shop. Here are a couple of colors I have made, thought I would share them with you and see what you think!

 Fun worn on an open neck, or over a shirt or sweater. Artsy, creative, unique~
Don't you want one too!
Happy Stitching.


Don't you want one too!
Happy Stitching.
Tuesday, August 2, 2011
Hand Sewing Made Easier
I hate to hand sew. I'll put a zipper in anything I can to avoid hand-closing a seam! I recently heard of a special hand sewing thread recently and decided to try it to see if it would make the chore easier.
 The thread is called Rice Silamide hand sewing thread. It is coated to keep it from knotting and allow it to pull easily through the fabric. It is also stronger than sewing machine thread and is less likely to break when under strain. I have to admit, it has made hand closing pillows much easier and less frustrating! If you haven't heard of or tried this product I would recommend that you give it a go. It is available for order online, have not seen it in my local stores, but maybe you will find it at your favorite sewing supplier.
Happy Stitching!
Happy Stitching!
Friday, July 8, 2011
Design Choices ~ Visualized
Working on some design choices for a client today and thought I would share. Graphic design software is so powerful in helping clients visualize how a fabric and design will look on their window. Using a photograph of the client's home and inserting the actual fabric selected, here are 3 proposals I just sent to a client.
![]()
![]()
![]()

Flat panel sections with jabots at each end.

Soft pleated sections with jabots at the ends and at each window break.

Mock Roman valance with contrast band at hem.
(as a side note, the mushroom paint in the recessed area will be re-painted to match the walls)
Which design would you choose and why? Would love to hear your feedback.
Happy Stitching!
Wednesday, July 6, 2011
Sheets that won't come untucked.
I was talking with a friend about sewing tips and remembered a favorite. Some years ago when my kids were younger, they would always kick off the top sheet of the bed. My daughter to the extent that we eventually stopped putting a top sheet on her bed. In the summer, she wanted that one sheet to cover up with (a blanket was too warm) so I needed to solve the problem. I took the sheets to my sewing machine and sewed the top sheet to the fitted sheet at the bottom and made it impossible to kick off the sheet.
A side benefit of this new attached sheet arrangement was how easy it was to make the bed. Now when the bottom sheet was on, the top sheet was there, centered, and in the correct position and only the sides needed tucking in.
My bed is Cal King, and if you have a bed this size, you have probably started to put the fitted sheet on only to discover it was a 1/4 turn off and had to rotate and re-place the sheet. I also found that when I tucked in enough topsheet on my thick mattress, that I was short sheeted at the top. Off to the machine again to sew together the top and fitted sheet. Now I have extra length in the top sheet, always know which is the bottom end of the fitted sheet, and bed making is quick and easy.
I promptly sewed together every sheet set in my house and everyone loves it!
How to attach the top sheet to the bottom sheet:
Find the bottom edge of your fitted sheet.
Mark the center of the fitted sheet bottom hem (1/2 way between the darts at the lower corners of the sheet)
Find the bottom edge of your top (flat) sheet.
Mark the center of the bottom edge of your top sheet.
Match the centers of the top and fitted sheet and pin.
Stretch the elastic in the fitted sheet until it is flat and match to the top sheet (there will be more width in the top sheet, just take the stretched, fitted sheet as far as it will go)
If you are sewing a larger bed size, you may want to pin again 1/2 way between the corner dart and the center mark (while stretching flat).
Sew the top sheet to the bottom sheet (while stretching the elastic flat) right above the elastic. You can use a straight stitch.
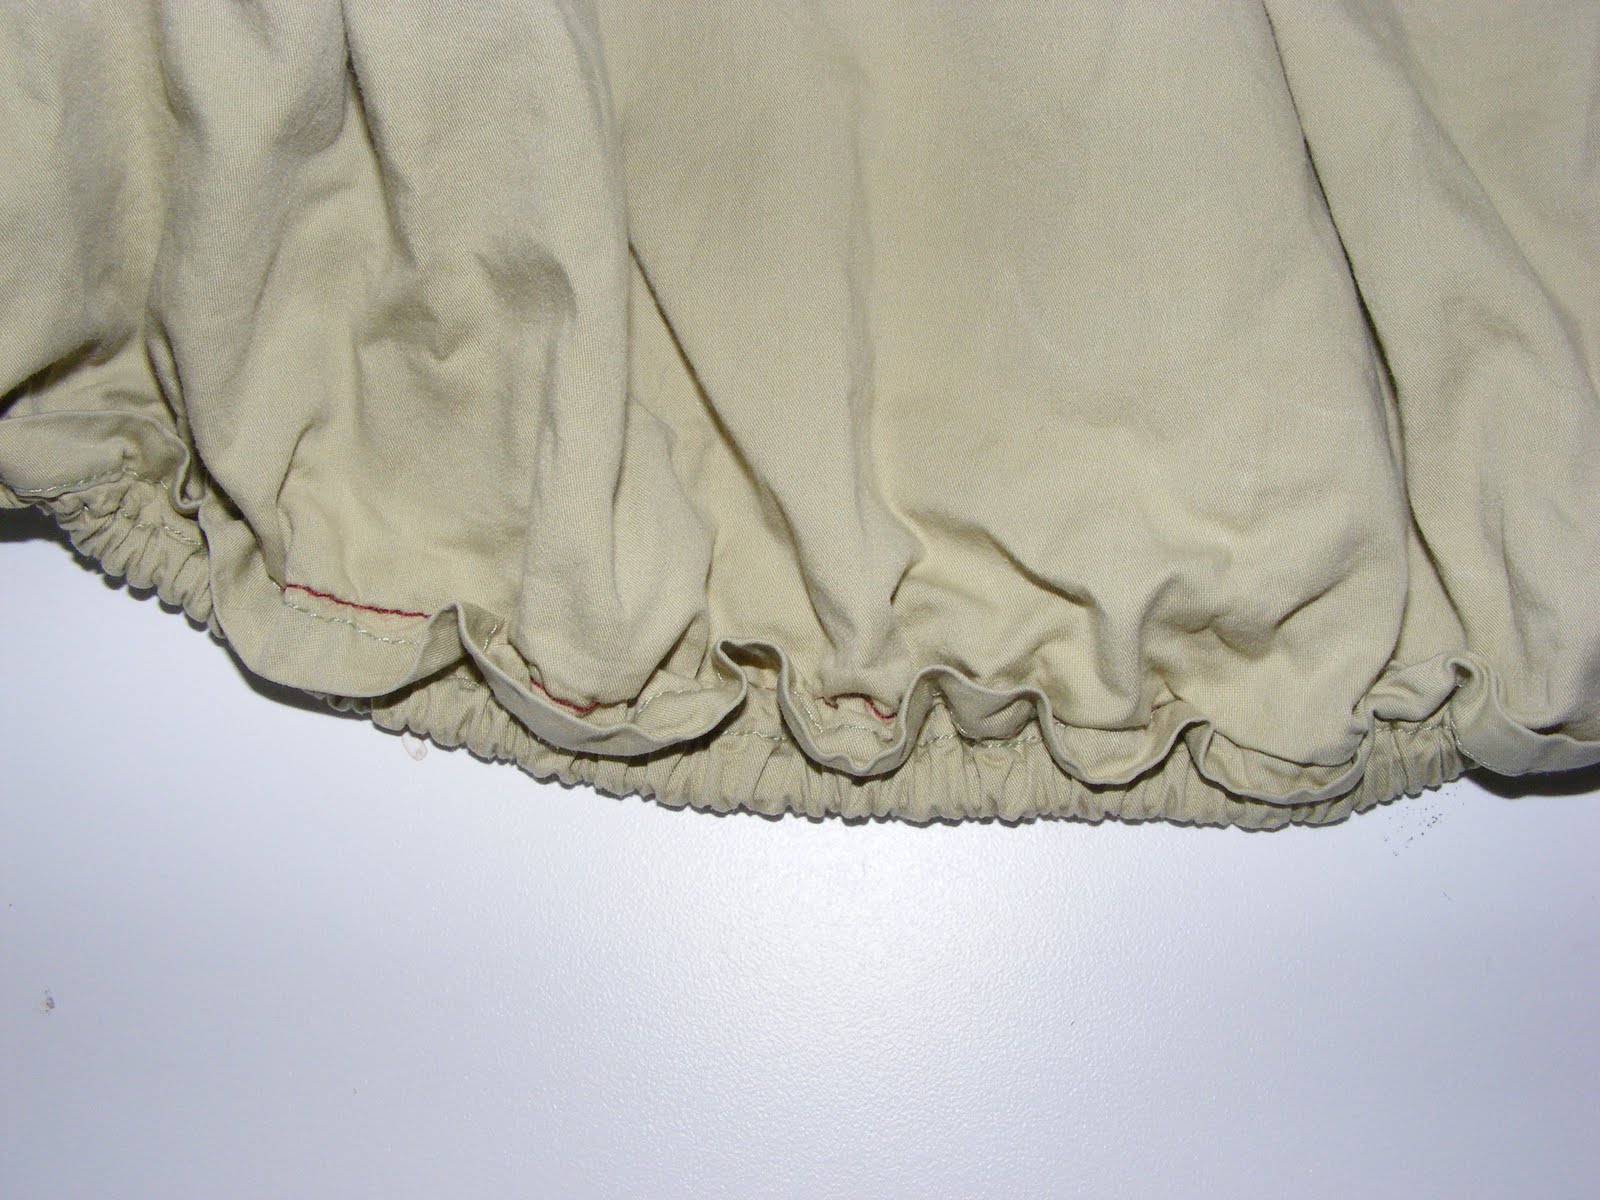
![]() When you finish, the sheet will look like this.
When you finish, the sheet will look like this.
![]() When you put the sheet on the bed, the elastic will be stretched out flat and the topsheet will flatten out with it. So easy, but so convenient.
When you put the sheet on the bed, the elastic will be stretched out flat and the topsheet will flatten out with it. So easy, but so convenient.
Do you have any cool tips like this? I would love to hear from you!
Happy Stitching!
Gail
A side benefit of this new attached sheet arrangement was how easy it was to make the bed. Now when the bottom sheet was on, the top sheet was there, centered, and in the correct position and only the sides needed tucking in.
My bed is Cal King, and if you have a bed this size, you have probably started to put the fitted sheet on only to discover it was a 1/4 turn off and had to rotate and re-place the sheet. I also found that when I tucked in enough topsheet on my thick mattress, that I was short sheeted at the top. Off to the machine again to sew together the top and fitted sheet. Now I have extra length in the top sheet, always know which is the bottom end of the fitted sheet, and bed making is quick and easy.
I promptly sewed together every sheet set in my house and everyone loves it!
How to attach the top sheet to the bottom sheet:
Find the bottom edge of your fitted sheet.
Mark the center of the fitted sheet bottom hem (1/2 way between the darts at the lower corners of the sheet)
Find the bottom edge of your top (flat) sheet.
Mark the center of the bottom edge of your top sheet.
Match the centers of the top and fitted sheet and pin.
Stretch the elastic in the fitted sheet until it is flat and match to the top sheet (there will be more width in the top sheet, just take the stretched, fitted sheet as far as it will go)
If you are sewing a larger bed size, you may want to pin again 1/2 way between the corner dart and the center mark (while stretching flat).
Sew the top sheet to the bottom sheet (while stretching the elastic flat) right above the elastic. You can use a straight stitch.

Do you have any cool tips like this? I would love to hear from you!
Happy Stitching!
Gail
Wednesday, June 22, 2011
Timesaving tip of the day, Labels!
As I was making pillows for a client today, I used a great timesaver. The fabric for the front of the pillows was a large scale print with no clear 'up' or direction. The back is in a chenille with no clear front or back side.
![]()
![]()

Since I was making multiples, I didn't want there to be a difference in the direction so it was important to decide right side for the chenille and a direction for the print. To do this, I keep a sheet of return address sized labels that say Wrong Side Up and a directional arrow:

I simply peel off a label and stick it on the back of each piece as it is cut to indicate the back side and direction so that as I assemble the project, I'm not stopping to decide direction, or worse yet, tearing out stitching on a piece sewn the wrong way! There is enough adhesive to stick well, but without leaving any residue when removed. Hope this tip helps you decide which way is up!
Happy stitching!
Friday, June 10, 2011
Sheer Ruffle Pillow Pattern for a Princess or a Ring-Bearer

If you have ever made wide ruffles, you know that getting the ruffle to lay flat can be a challenge. This pattern will instruct you in making the ruffle so it will flare properly.
This pattern would also make a beautiful ring bearer's pillow.

To view this and other patterns in my Etsy shop, click on this link http://www.etsy.com/listing/75766744/sheer-ruffle-pillow-pdf-pattern-diy-ring or on my Etsy shop in the right side bar.
Where would you like to see this pillow in your house?
Don't want to sew it yourself? Contact me to create one just for you!
Happy Stitching!
Monday, June 6, 2011
Tip for loose threads.

When you have slid that fab seam ripper along the seam to cut away the stitching, you are left with lots of loose threads. The best and quickest way I have found to get rid of those threads prior to re-sewing your seam is to use masking tape. Tear off an 8-12" piece of tape, place it over the thready area, press it down firmly, then peel away. For most fabrics the tape will pick up 95% of the threads in one stick! You can use the tape a few times before it loses its tackiness, but just tear a new strip and you are on your way.
Masking tape is also great for marking fabric (wrong side, this side up, labeling a pattern piece, etc.) and can be used for basting a zipper. I recommend testing a piece first if you are going to use tape on the right side of a fabric, or on the back side of a napped fabric, but most fabrics will do great with masking tape!
As I was searching for images for this post, I came across this cool assortment of colored tape:

http://www.omiyage.ca/category/tape
Where they sell solid and printed tapes for crafting and artwork. Not as cheap as the hardware stuff, but ooooo, doesn't it get your creative juices flowing!
What would you do with cool patterned masking tape?
Tuesday, May 31, 2011
Bifocal reading glasses, my most recent favorite sewing accessory!

If you are like me, you keep reading glasses posted all over the house in strategic places. Of course, my workroom is one of those locations. Seems that when I needed the glasses, they were always on the other side of the room, so I got a chain so they could hang around my neck. I would put them on, take them off, put them on...etc. Tiring of looking up to see everything blurry, or peeking over the top of them, or worse yet, being seen with glasses hanging around my neck (do I look like an old lady already?), nothing was working.
Then I remembered hearing of sunglasses that had a bifocal magnifier. In other words, the main lens area is clear (no correction) and the bottom section is for reading. Surely there must be a clear version so... I looked at all the local reading glass suppliers, but none carried clear bifocals so I went online. Found a great selection at reasonable prices at Boomers in the Know (under $20 with online coupon). I selected the blue frame pictured above and now have a cute pair of glasses that I don't have to take on and off while working. They were great for my latest Bunco game too, I could see the die and my friends!
Maybe clear bifocal readers can help you see better for your next sewing or crafting project.
Happy Stitching!
Thursday, May 26, 2011
Winner of the Give Away Day Drawing Announced!

Many thanks to all the new followers and commenters on this blog. As a thanks for entering the drawing, I have sent a private message to most of you offering a 1/2 price coupon on any pattern offered in my Etsy shop! I will say, there were a few who have their contact information blocked and did not leave an email address, so I was not able to send you the coupon code. If you would like the code, you can email me (address at the right) and I will happily forward it to you! The discount offer is good through May 31st.
Again, a big thank you to all who became followers, commented, reposted on Facebook, and in any way supported this contest.
Happy Stitching!
Sunday, May 22, 2011
Give Away Day! Entries accepted until May 25th. Enter to win a FREE pattern from Gaila Designs

If you would like to win your choice of one PDF sewing pattern from Gaila Designs simply sign up as a follower or leave a comment and we will draw a random entry from all new followers and comments.
For more information and description of the patterns, visit my Etsy shop www.etsy.com/shop/gailadesigns or click on the Etsy shop link on the right side bar.
****please note, this is a give away for the PDF Pattern, not the finished item****
eReader and iPad covers (finished) are available for purchase in my Etsy shop
Currently there are patterns for:
 Sweetheart Pillow
 iPad or Kindle DX cover with zipper, fully padded and lined
 Volleyball pillow
 Geometry Pillow
 eReader cover for Kindle 2,3, Nook, Nook Color, Sony, Kobo
Enter your email address to become a follower at right
or
Leave a comment with your email address, sharing your favorite sewing or crafting tool and why you love it!
Winner will be selected and announced on May 26th
PDF will be emailed to the winner upon confirmation of your choice of pattern.
Wednesday, May 18, 2011
Pulp Fashion at the SF Legion of Honor Museum, How do I get this job?


"Elizabeth I Court Dress," 2001, inspired by a portrait by the studio of Nicholas Hilliard.
Monday, May 16, 2011
Stapler for the sewing room

Staple basting is great for pleats. If you have ever tried to pin in pleats, especially if the fabric is thick or multiple pleats are on top of each other, I'm sure you've found that the pins cause the pleats to shift and change. If you staple the pleats, they will stay secure and flat!
If you are sewing a trim or welt into a seam and find the fabric is drawing or gathering up under the trim, staple baste the trim in the seam allowance. The fabric and trim will move at the same pace and you will no longer get the gathering effect!
Once you have a stapler in your sewing box, you will find many uses.
Depending on where you are basting, you might not even need to remove the staples after your project is complete (only you can decide whether to leave or remove).
I use two styles of removers, depending on the fabric. The one I use most often is a simple, straight style remover:


Have you used a stapler in your projects? I would love to hear your story.
Happy Stitching!
Wednesday, May 11, 2011
Clothepins in the sewing room, extra hands!

When you need an extra pair of hands (or fingers), clothespins can do the trick! Glueing trim? Use clothespins to hold the item in place while the glue sets up. Making pleats? Hold them temporarily with a clothespin.

I keep two styles of clothespins in my sewing drawer, the traditional wooden style and a plastic set like the one pictured here that curves around bulky sections and has a small contact area, I find times when I need both types of contact.
Clothespins are the 'vise' of your toolkit for sewing!
Have you used clothespins for a creative use in sewing? Would love to hear from you!
Happy Stitching.
Saturday, May 7, 2011
Magnetic Bobbin Holder...do we see a trend in posts?


Do you have a favorite magnetic device in your sewing space? If so, I would love to hear from you!
Happy stitching!
Thursday, May 5, 2011
Magnets in the Sewing Room (part 2)? Oh yes!

So I recently heard of another fabulous magnetic item I had to have. It is available at the auto parts supply stores and is called a pickup tool ~ mine cost only $2. It looks like a pen, but telescopes to allow you to pick up any metal item without bending over (or crawling under your sewing table). How many bobbins have I dropped on the floor, causing me to stop, get out of my chair and duck under the table to fish it out. How about dropped needles, pins, presser feet...you get the picture! Keep this cool tool in your pocket, tool belt, or at least next to your sewing machine to save time and your back.
Happy Stitching!
Monday, May 2, 2011
Magnets in the Sewing Room? Another must-have item!
For many years I had one of those magnetic pinholders you get at the fabric store with a hole at the top, a clear plastic container and a magnet around the hole to keep the pins in (sort of). Mine was old enough it was lime green plastic, though I remember a lot of gold ones around that time! It worked okay, but seemed like it never held enough pins and if it hit the floor, the pins spilled out and had to be picked up by hand and stuffed back in the hole.
Then I was introduced to the magnetic tool bowl!
 It makes a wonderful pin holder. The magnet on the base of the bowl is very strong and holds your pins (and other magnetic items securely). The wide area of the bowl allows you to see the contents easily and makes it simple to grab the pins. The base also sticks to your machine (if you are lucky enough to have one that is actually made out of metal) to help keep the bowl from getting knocked off the table. If it does fall, it holds the pins pretty tightly, but if you have a spill, you can just waive the bowl over the floor and it will attract the pins effectively making clean-up a snap!
Check your local hardware store or automotive part supplier for a magnetic tool holder or magnetic parts holder. Costs less than $10 and is a wonderful addition to your sewing kit.
What is your favorite sewing gadget...please share!
Happy Stitching!
Then I was introduced to the magnetic tool bowl!
Check your local hardware store or automotive part supplier for a magnetic tool holder or magnetic parts holder. Costs less than $10 and is a wonderful addition to your sewing kit.
What is your favorite sewing gadget...please share!
Happy Stitching!
Wednesday, April 27, 2011
The Amazing Zipper Pouch
I recently saw this cool bag that a friend had. It was made all in black zipper and, well, you have to see it to appreciate it. I had to make one. Here is the finished bag:
 Why is it amazing? Simply begin to unzip...
 Oh, you can unzip more than that!
 C'mon, all the way!!!
 Isn't that cool? Well, my thoughts of making and selling these cuties or creating a tutorial have gone by the wayside as I discovered the market is covered in ready made product called Zipit (surely a legally protected design), but how fun to make yourself! I followed a free tutorial found here : http://www.craftster.org/forum/index.php?topic=164630.0
My pouch finished at 6" wide by 4.5" tall. I used 2 colors of zipper by the yard and used 2 yards of each color (#5 nylon coil) to make this size. I separated the pink and the purple and zipped them back together to form the stripe effect. With 2 colors and 2 yards each, you would get 2 pouches of course. If you use a single color, 2 yards will make one pouch.
So where do you find zipper by the yard? There are probably a lot of online sources, but I use http://www.zipperlady.com/ for my zippers. She sells retail and wholesale.
Happy stitching!
Tuesday, April 26, 2011
Tie the perfect bow
When you tie a bow, does it turn sideways and look like this? Yuck!
 The trick to tying a bow that is horizontal is simple and the secret is in the knot before the bow. Tie your single knot and identify the tail that is on top, in this next picture, it is the tail to the left.
 The left tail is the one you must use to make the center knot of the bow. In doing so, your bow will always sit horizontally.
 I have taken the right tail to form the first loop of the bow and the left (top of the knot) tail to form the center of the bow. Finish the bow and...
 ...your bow will sit nicely in the horizontal position you desired!
I have found that the 'natural' way I tie a knot and then a bow will always set the bow sideways. I have to look at my knot and make sure the top tail is in the right place so my bow sits straight! So simple, so effective.
Tip: If you are making a bow without a knot - like sewing ribbon onto an item for a stationary bow - sew the ribbon on vertically so you have a top and bottom tail, then tie the bow (no knot) as directed above and your decorative bow will also be horizontal.
Happy stitching!
Friday, April 22, 2011
Sewing room must have - Tag Gun!

Happy stitching (or tagging!).
Monday, April 18, 2011
Tool Belt for Sewing

Happy stitiching!
Thursday, April 14, 2011
Supplies you must have for your sewing cabinet
As I am working on a new pattern for a Volleyball Pillow, I am reminded of another 'must have' item if you work with fabrics ~ Wrinkle Releaser. If you have discovered this wonderful product already, you have probably used it to get wrinkles out of t-shirts and other clothing so you can 'spray and go' without the time and hassle of ironing.

Happy Stitching.
What you may not have discovered is that if you spray a badly creased fabric, then press, it will get that crease out. Because the volleyball requires piecing of a few small strips of fabrics, I purchased fat quarters from the quilting area (on sale when I was at the fabric store). If you are not a quilt person (like me) fat quarters are rectangles of cotton prints and come folded a bunch of times and nicely packaged for quick selection and sale. The ones I selected were folded and (I think) pressed, so the grid of creases was not coming out. No problem, I reached for my trusty Wrinkle Releaser and voila, no more creases!
Gotta have a Wrinkle Releaser in your sewing kit!
Subscribe to:
Posts (Atom)