Wednesday, June 22, 2011

Timesaving tip of the day, Labels!

As I was making pillows for a client today, I used a great timesaver.  The fabric for the front of the pillows was a large scale print with no clear 'up' or direction.  The back is in a chenille with no clear front or back side. 

Since I was making multiples, I didn't want there to be a difference in the direction so it was important to decide right side for the chenille and a direction for the print.  To do this, I keep a sheet of return address sized labels that say Wrong Side Up and a directional arrow:


I simply peel off a label and stick it on the back of each piece as it is cut to indicate the back side and direction so that as I assemble the project, I'm not stopping to decide direction, or worse yet, tearing out stitching on a piece sewn the wrong way!  There is enough adhesive to stick well, but without leaving any residue when removed.  Hope this tip helps you decide which way is up!

Happy stitching!

Friday, June 10, 2011

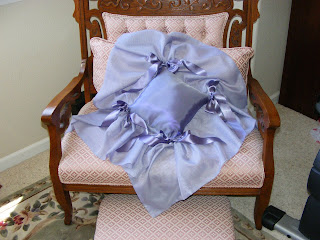
Sheer Ruffle Pillow Pattern for a Princess or a Ring-Bearer

A few weeks ago I was shopping at a local furniture store and in the bedding section, they had this fabulous pillow with a huge sheer ruffle.  I could see it in a little girl's room....or maybe even a big girl's room!  It was so fun, I thought that others might want to make one.

If you have ever made wide ruffles, you know that getting the ruffle to lay flat can be a challenge.  This pattern will instruct you in making the ruffle so it will flare properly.

This pattern would also make a beautiful ring bearer's pillow.
Make it in a color to coordinate with the wedding party, or in white or off-white to match the bride's dress.  You could also add rose petals, pailettes, or confetti inside the ruffle for a really fun effect.

To view this and other patterns in my Etsy shop, click on this link  http://www.etsy.com/listing/75766744/sheer-ruffle-pillow-pdf-pattern-diy-ring  or on my Etsy shop in the right side bar.

Where would you like to see this pillow in your house?

Don't want to sew it yourself?  Contact me to create one just for you!

Happy Stitching!

Monday, June 6, 2011

Tip for loose threads.

So, when asking everyone what their favorite tool was in the sewing room, an overwhelming number of you stated that the seam ripper was your best tool.  Now I agree, the seam ripper is a great tool, though often having to use it means you made a mistake (dang it!) but sometimes it's a remodel so that's okay!  Today I was putting a blackout liner in a ready-made drapery panel for a client, so it was a seam ripper day, but a good one.  In the process, I used a technique I wanted to share with you.

When you have slid that fab seam ripper along the seam to cut away the stitching, you are left with lots of loose threads.  The best and quickest way I have found to get rid of those threads prior to re-sewing your seam is to use masking tape.  Tear off an 8-12" piece of tape, place it over the thready area, press it down firmly, then peel away.  For most fabrics the tape will pick up 95% of the threads in one stick!  You can use the tape a few times before it loses its tackiness, but just tear a new strip and you are on your way.

Masking tape is also great for marking fabric (wrong side, this side up, labeling a pattern piece, etc.) and can be used for basting a zipper.  I recommend testing a piece first if you are going to use tape on the right side of a fabric, or on the back side of a napped fabric, but most fabrics will do great with masking tape!

As I was searching for images for this post, I came across this cool assortment of colored tape:

Don't you want some of this lovely stuff!  I went to this link:
http://www.omiyage.ca/category/tape
Where they sell solid and printed tapes for crafting and artwork.  Not as cheap as the hardware stuff, but ooooo, doesn't it get your creative juices flowing!

What would you do with cool patterned masking tape?